Tuesday, January 27, 2015

Jupiter Triple Shadow Transit, 23 Jan 2015

Although I'm not much of a lunar/planetary astrophotographer, one thing that is exciting about taking pictures of nearby objects is that unlike deep sky objects, nearby celestial bodies show a lot of dynamic change. Jupiter is a great example: it is easy to see the rapid rotation of the planet, the orbital motions of its moons, and dynamic events like transits, eclipses, and shadow transits (the passing of a moon's shadow across the face of Jupiter).

Transits and shadow transits occur frequently. I use the "JupiterMoons" app from Sky and Telescope to find out about them. But last Friday night was special, because it was one of the rare times when the shadows of 3 of Jupiter's big Galilean moons were simultaneously visible transiting the disk of the planet.  These "triple shadow transits" happen roughly once in a decade; I believe the next one will not occur for another 17 years. Luckily, two good things happened last Friday: I saw a reminder of the triple shadow transit that afternoon, and the weather here was clear. So even though I'm not very skilled at lunar/planetary data acquisition or processing, I decided this was something I could not pass up.

I used a $30 Logitech c270 HD webcam as my imager. It has fairly small pixels (I believe they are 2.8 microns square) and has reasonably high data transfer rates with a USB2 interface. I modified it to fit my focuser by removing the lens on the front and replacing it with a 1.25" adapter (I just hot glued the adapter onto the camera). I did all this many months ago, so I have some experience using the camera. I use a 3x Meade Barlow lens to get a more magnified image than I could get with just the 800 mm native focal length of my AT8IN newtonian telescope; this puts me at 2400 mm focal length (still not great for planetary work, but the best I can do with my equipment). I had wanted to use SharpCap to control my imaging session, but as Jupiter rose above the mountains to my east I could not get VMWare/Windows 7 to recognize the camera. I was able to see it fine via Mac OSX 10.10.1, so rather than waste time fighting the software I decided to go with the Mac software I have, imaging with BTV and controlling the camera settings with WebCam Settings.

The next challenge was getting focused and getting Jupiter into the field of view. I focused by finding a nearby streetlight, figuring that would get me close enough, and it did. Then I took an image through my guide scope and plate solved with Astrotorilla, then used the PicGoto to slew to Jupiter's coordinates, obtained from Astroplanner. This got Jupiter into my guide scope field of view, but not into the imager (my guide scope was only roughly aligned). From there I just slewed around until I got lucky. I focused and started imaging.

The goal when shooting Jupiter is to get as many frames as possible so that your software (Registax in my case) can find the few where the seeing is good and stack them. At first I used the full field of view of the camera (1280 x 800, if I remember correctly) and 2 minute videos. This leaves lots of wasted black space around Jupiter and makes the data transfers (and the frame rate) relatively slow, so I cut back to 640 x 480 to make the videos smaller and improve the frame rate. In retrospect, I probably should have cut down even more to improve my frame rate further. I had intended to just make one long video and cut it into 2 minute segments for processing and stacking, but BTV apparently is limited to 3 minutes so I went with that and refocused every 3 minutes. This is a little too long because the planet's rotation is reported to blur images using more than about 2 minutes' worth of data, but I went with it. Seeing wasn't great so focusing was hard, and this is obvious in some of my stacked data.

After Registax processing using automatic alignpoints and 75 best frames per alignpoint, followed by wavelet sharpening, I got a series of frames that I combined using Photoshop CC 2014. I took a lot of time adding in timestamps for the various frames. Here's the result. It’s interesting that it is possible to see Europa’s disk (not the shadow, the actual disk) entering transit and Io’s leaving (both happen at about the same time, at about 00:06-00:010). It is also interesting to observe the relative speeds that the shadows move across Jupiter. At the beginning of the session, the shadows of Io and Callisto overlap near the center of the image, but Io's moves off quickly, reflecting the fact that Io is the innermost Galilean and so its orbital speed is high. Likewise, Europa's shadow (entering from the right of the image) moves more quickly than Callisto's because Europa is the 2nd closest Galilean to Jupiter whereas Callisto is the outmost big moon.
Despite my less-than-stellar planetary  astrophotography skills, I couldn’t pass up a chance to image the triple shadow transit. Seeing was variable, but in the best images such as the title frame the detail was reasonable given my equipment and skill level. It’s interesting that it is possible to see Europa’s disk (not the shadow, the actual disk) entering transit and Io’s leaving (both happen at about the same time, at about 00:06-00:010). I would have liked to use SharpCap to control this session, but I couldn’t get VMWare/Win 7 to recognize the Logitech webcam, whereas MacOS was seeing it so I went with the MacOS solution.

Date: 23 Jan 2015
Subject: Jupiter triple shadow transit
Scope: AT8IN, 3x Barlow(f/12, 2400 mm)
Mount: CG-5
Guiding: PHD2 (on a star)
Camera: Logitech c270 HD at 640 x 480
Acquisition: BTV+WebCam Settings
Exposure: 180 sec, ~15 fps mov
Stacking: Registax 6, automatic alignpoint selection, best 75 frames/alignpoint

Processing: Registax 6 wavelets, CS6 combine into animated GIF

Sunday, January 25, 2015

The Heart of the Comet

My title comes from a David Brin & Gregory Benford book a read a long time ago about a mission to Halley's Comet. Comet Lovejoy (C/2014 Q2) has been in good position all month, and I've attempted to image it a couple of times. I've found comet imaging to be difficult, because not only are the stars moving as the Earth rotates under them, but the comet itself is moving on a different orbit. Thus it is hard to track the comet for long exposure images.

My solution was to use my autoguider to track the comet's nucleus. Lovejoy has a bright nucleus; if you look at it in binoculars or a small telescope the fuzzy green nucleus is all you can see (or at least it's all I  have been able to see visually), and it is easy to see with binoculars so I recommend taking a look while it's around. Evidently the green color is due to emission from C<sub>2</sub> molecules coming off the comet and being excited by sunlight. Guiding on the nucleus isn't ideal, because the nucleus is pretty large. The guider has a hard time staying centered, but I wanted long exposures so I could pick up the tail.

My first attempts were on 7 Jan 2015. I had coordinates for the comet's position on 7 Jan and 8 Jan. I found the comet by synching the scope using an Astrotortilla plate solve, doing a goto to the 7 Jan position, then, after slewing around and failing to find the comet, going to the 8 Jan position. I knew the comet would be somewhere between the 2 points, and it was. I took a bunch of 120 s subframes, guiding on the comet. It was fairly easy to combine them into an animated GIF in Photoshop, making a "movie" of the comet's motion, which was fairly fast.

Date: 7 Jan 2015
Subject: Comet C/2014 Q2 Lovejoy
Scope: Orion ST80 + Antares 0.5x telereducer
Filter: Baader Fringe Killer
Mount: CG-5 (Synta motors, PicGoto Simplificado)
Guiding: 9x50 Finder/Guider + DSI Ic + PHD 2.4.2 (Win 7 ASCOM)
Camera: DSI IIc no cooling (5 °C)
Acquisition: Nebulosity 3.2.2, no dither
Exposure: 56x120 s (not stacked)
Stacking: Neb 3, bad pixel map, bias included, no flats, histogram match, debayer, trans+rot align, 1.5 SD stack.

Processing: Photoshop CC 2014 + Carboni Astronomy Tools levels, auto color, frame animate

I had a lot of trouble trying to stack the comet images. Deep Sky Stacker has a comet stacking feature that follows the comet nucleus with one set of images and stacks them, then aligns on the stars, ignoring the comet and stacks them, then combines the two. However, I just couldn't get that to work well for me (and I tried pretty hard; no doubt I've been doing something wrong). I had the best luck using Nebulosity to align with a "translation only" method, aligning on the comet nucleus. This makes the stars trail, but a rigorous standard deviation clip gets rid of a lot of them. Finally I had some dust bunnies to clean up in Photoshop.  Here's a single frame, followed by the stack:

Imaged through hazy skies (it’s inversion season here). This is a single exposure as I could not figure out how to get stacking to work. At least I was able to capture a little of the tail (I deliberately overexposed the nucleus in order to do so). 

Date: 7 Jan 2015
Subject: Comet C/2014 Q2 Lovejoy
Scope: Orion ST80 + Antares 0.5x telereducer
Filter: Baader Fringe Killer
Mount: CG-5 (Synta motors, PicGoto Simplificado)
Guiding: 9x50 Finder/Guider + DSI Ic + PHD 2.4.2 (Win 7 ASCOM)
Camera: DSI IIc no cooling (5 °C)
Acquisition: Nebulosity 3.2.2, no dither
Exposure: 1x120 s (not stacked)
Stacking: Neb 3, bad pixel map, bias included, no flats, histogram match, debayer, trans+rot align, 1.5 SD stack.

Processing: StarTools 1.3.5.289 Contrast; HDR:Equalize; Contrast; Color: blue bias reduce 1.72, green bias reduce 1.93, red bias reduce 1.61; Track 1.8 pix. Photoshop CC 2014 + Carboni Astronomy Tools levels, auto color, deep space noise reduction, more levels, Astroframe.


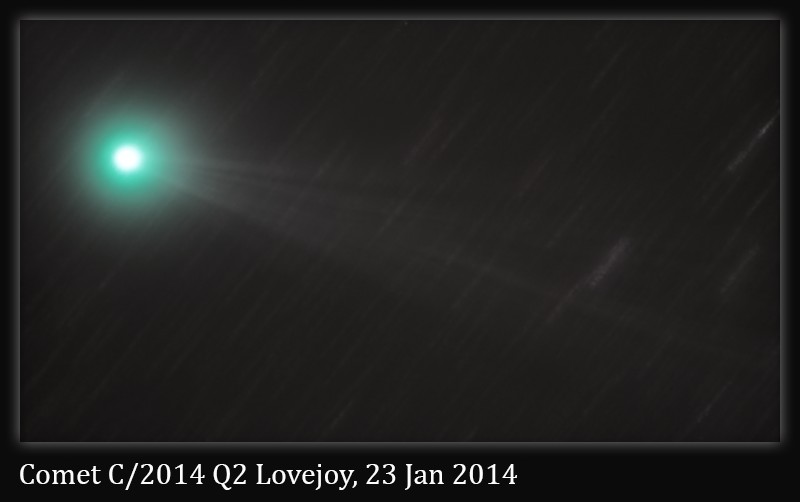
On 23 Jan 2015 I had heard about the triple shadow transit of Jupiter's moons across the planet (I'll post separately about that), so I hauled my gear out and decided to image Lovejoy again while I was waiting for Jupiter to rise. This time I had current coordinates (I found you could import the comet empheris data into Astroplanner, which then gives current coordinates). So I synched with an Astrotortilla plate solve and did the goto, and I was right on! Amazing! This time I framed the shot to get as much of the tail as possible, and guided on the nucleus again. There was a lot less moonlight, and the comet was near the zenith (in fact, my scope bumped toward the end of the run, but the guider kept the comet in frame as the camera rotated so I didn't know it until I started processing). This time I went straight to Nebulosity and stacked on the nucleus as before. I like the result.

Decided to try Lovejoy again while waiting for Jupiter to rise so I could attempt imaging the triple shadow transit. Found the comet by Astrotortilla plate solving to sync the PicGoto, followed by a goto the coordinates reported in Astroplanner. This worked great. Guided on the comet nucleus. The sky was darker than it was on 7 Jan, and I can see a lot more tail than then. The proper motion of the comet was also noticeably less than on the 7th.

Date: 23 Jan 2015
Subject: Comet C/2014 Q2 Lovejoy
Scope: Orion ST80 + Antares 0.5x telereducer
Filter: Baader Fringe Killer
Mount: CG-5 (Synta motors, PicGoto Simplificado)
Guiding: 9x50 Finder/Guider + DSI Ic + PHD 2.4.2 (Win 7 ASCOM)
Camera: DSI IIc no cooling (5 °C)
Acquisition: Nebulosity 3.2.2, no dither
Exposure: 45x120 s
Stacking: Neb 3, bad pixel map, bias included, no flats, histogram match, debayer, trans (only) align, 0.5 SD stack.

Processing: StarTools 1.3.5.289 Crop; Develop 69.89%; Color:Scientific 201%; HDR:Optimize; Life:Less=More; Track 2.0 pix. Photoshop CC 2014 + Carboni Astronomy Tools 2 stages of dust & scratches with Gaussian blurred layer masks to take out one slight dust bunny; Astroframe.

After reading some advice about how to "star freeze" a comet image (see the url below), I decided to try one more time using Deep Sky Stacker to stack my 23 Jan 2015 Lovejoy images. I reprocessed roughly following the method of Tony Cook (http://astrob.in/151422/0/) except I didn’t do any of the "sieving" described in his method; it didn’t seem to help (in retrospect, I may want to try again with courser "sieving"; that might get rid of the remaining star trailing). As a result, I still have some star trail streaking in the comet’s tail, but I think this is dramatically better than what I got earlier. Deep Sky Stacker’s “comet only” mode gave me a sharper comet than I was able to get stacking with Nebulosity. I tried darkening the overall image to remove some of the star trail streaking, but this sacrificed some of the tail, so I backed off of that. Here's the result:

Saturday, January 3, 2015

"Planet of the Apes" on New Year's Day

The Monkey Head Nebula looked like it ought to make a good Hα target, and with the bright Moon nearby that seemed to be a good approach. This was my first attempt on this target. I used Astrotortilla/PicGoto to find it, but had a terrible time initially. I suspect either a bad plate solve (unlikely) or that the software didn't properly recognize the "invert" checkbox in PicGoto so the gotos were in the wrong direction until I explicitly unchecked and checked the box (more likely). So it took me a while to find this target, because I didn't know how bright the nebulosity was going to be and so took some 600 s subframes while hunting for it. Now I know what sky with no Hα emission looks like through the Hα filter with long exposures (you of course just see stars). Finally I got everything sorted and found the Monkey Head easily; it's easily visible in Hα at 20 s, and if you know it's there, in only 3 s (so it's plenty bright enough). It was very cold again (-8.5 to -11.5 °C on the CCD), enough so that it makes the grease in the mount pretty viscous. I imaged up to the meridian while watching my least favorite football team lose in the playoffs (yay!), then performed a flip and easily reacquired, realigned, and imaged until the neighbors' trees got in the way. This really does look like a monkey's head in profile; "Planet of the Apes" in the sky! I could have imaged it with the AT8IN, but didn't for 2 reasons: I already had the ST80 set up and I'm lazy, and I thought the framing might be better with the ST80 because it allows some space to show around the nebula. I'll need to wait for the Moon to go away and try for some RGB to mix in.


Date: 1 Jan 2015
Subject: NGC 2174, Monkey Head Nebula
Scope: Orion ST80 + Antares 0.5x telereducer
Filter: Baader 7 nm Hα
Mount: CG-5 (Synta motors, PicGoto Simplificado)
Guiding: 9x50 Finder/Guider + DSI Ic + PHD 2.4.1 (Win 7 ASCOM)
Camera: DSI IIc no cooling (-8.5 to -11.5 °C)
Acquisition: Nebulosity 3.2.1, no dither
Exposure: 52x600 s
Stacking: Neb 3, bad pixel map, bias included, no flats, extract R, histogram match, square, trans+rot align, 1.5 SD stack.

Processing: StarTools 1.3.5.289 Crop; Develop 74.99%; HDR:Optimize; Deconvolute: 4.2 pix; Track 3.0 pix; Magic 1 pix. Photoshop CC 2014 + Carboni Astronomy Tools Hα false color black sky; Astroframe.