Thursday, December 18, 2014

Supernova Remnants

The weather in Utah has not been conducive to astrophotography lately. I've gotten in just a few imaging sessions, and have been working to combine with old data. Both my recent efforts are supernova remnants. Along with Wolf-Rayet "wind nebulae," these make some of the most beautiful objects in the sky.

First, I returned to the Crab Nebula, the famous remnant of the supernova observed by the Chinese in 1054. The Crab is a bit small for the focal lengths available to me, so I used my coma corrector, which increases the focal length by about 10%. Of course this is also my most challenging situation for guiding both because of the increased magnification and because the focuser has to be racked way out with the relatively heavy coma corrector in place. Conditions weren't great as a good winter storm was on its way so there were a few high clouds preceding the storm. I synched from β Tau and the PicGoto as usual was right on. I stopped a few times to refocus; the focus kept shifting as the temperature went down, but finally stabilized. I was expecting the mount to bump around 2:30 AM, but it missed so I continued getting decent data until M1 moved into the neighbor's trees. I threw out a bunch of subframes due to clouds and some trailing, but still got 51 that were usable. I aligned and combined these with 38 I had taken previously (19 Dec 2012) to get my deepest, richest Crab so far.
Date: 21 Nov 2014
Subject: M1, Crab Nebula
Scope: AT8IN + HPS Coma Corrector
Filter: Baader Planetarium Fringe Killer
Mount: CG-5 (Synta motors, PicGoto Simplificado)
Guiding: 9x50 Finder/Guider + DSI Ic + PHD 2.3.1l (Win 7 ASCOM)
Camera: DSI IIc no chiller 8 °C
Acquisition: Nebulosity 3.2.1, no dither
Exposure: 51x300 s + 38x300 (19Dec12)
Stacking: Neb 3, bad pixel map, bias included, 49 flats, normalize, deBayer & square, trans+rot align, 1.5 SD stack.

Processing: StarTools 1.3.5.289 Crop; Wipe: Aggressiveness 94%, Drop off point 40%; Develop 85.22%; HDR:Core reveal; Color:Scientific, 300%;  Life:Moderate; Deconvolute: 3.0 pix; Track 3.2 pix; Magic 2 pix. Photoshop CC 2014 + Carboni Astronomy Tools healing brush; Increase star color; Layer masked levels;  Layer masked less crunchy more fuzzy; Astroframe.

The storm and clouds came, followed by a warm period with frustratingly "almost good enough" weather characterized by frequent high clouds. I finally got out and attempted the Jellyfish nebula, another supernova remnant. According to Wikipedia, the explosion of this star would have been detectable on Earth between 3000 and 30,000 years ago; there is no record of it being observed. In any event, it is an older remnant than the Crab, which is still less than 1000 years old. Imaging is challenging because the bright star η Geminorum is in the field of view. For this object I wanted to largest field of view I have, which is what I get with the ST-80 refractor combined with a 0.5x focal reducer (which actually gives a reduction of 0.65x when mounted on my camera nosepiece; any additional reduction causes nasty aberrations). I already had RGB data from last February. I wanted to see what the Jellyfish looks like in Hα this time and was not disappointed. I had a hard time getting a plate solve through the main imager (I always seem to have a harder time with plate solves when using the Hα filter), but eventually I got it to work and got on target with the Astrotortilla/PicGoto combination. I didn't even look at the CCD temperature, but it was a warm night for December in Utah. The session started with clear skies, but the sky got progressively worse and by about 1 AM when I went out to check on doing a meridian flip there were high, thin clouds almost everywhere. What follows is an animation showing the Hα in grayscale and in false color.
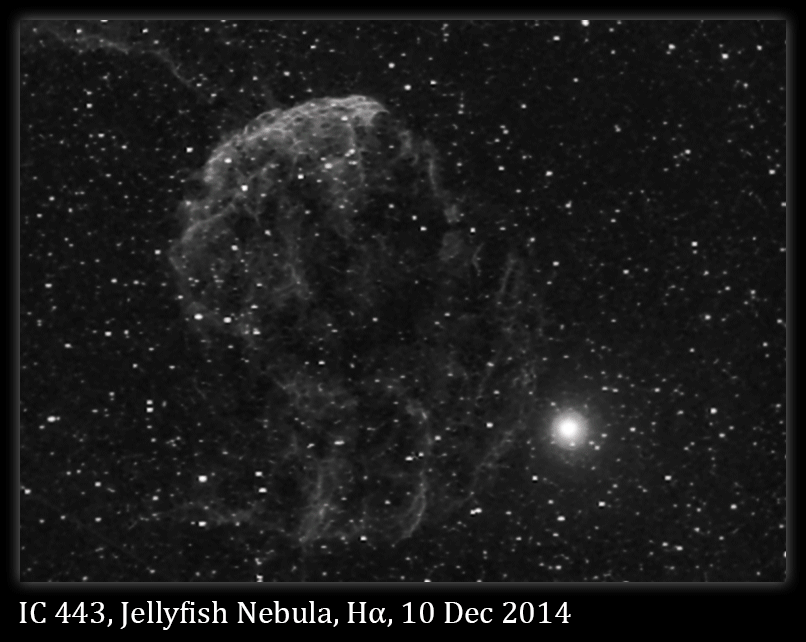
Date: 10 Dec 2014
Subject: IC 443, Jellyfish Nebula
Scope: Orion ST-80+Antares 0.5x focal reducer
Filter: Baader Planetarium Hα
Mount: CG-5 (Synta motors, PicGoto Simplificado)
Guiding: 9x50 Finder/Guider + DSI Ic + PHD 2.4.1 (Win 7 ASCOM)
Camera: DSI IIc no chiller ~8 °C
Acquisition: Nebulosity 3.2.1, no dither
Exposure: 26x600 s
Stacking: Neb 3, bad pixel map, bias included, no flats, OSC extract R, normalize, square, trans+rot align, 1.5 SD stack.
Processing: StarTools 1.3.5.289 Crop; Develop 79.84%; HDR:Optimize; Deconvolute: 3.0 pix; Contrast; Life:Moderate; Track 4.6 pix; Magic 1 pix. Photoshop CC 2014 + Carboni Astronomy Tools Make stars smaller; Hα false color black sky; Astroframe.

Next I tried combining the Hα with my RGB data. First, here is the RGB image so you can see where I started. There are a lot of background stars, and most of the nebulosity is faint.


One way of combining is to simply use the Hα as luminance. That dims the background stars, which are not as bright in Hα, and brings up the Hα-emitting nebulosity. That is shown here:
This image combines Hα data from 10 Dec 2014 with RGB data from 25 Feb 2014. In this case, I used Hα for luminance and the straight RGB image. It doesn’t look nearly as good, in my opinion, as in the Starizona method below, which combines the Hα with R and uses that for both luminance and the R channel.


A more sophisticated method is to mix the Hα with the original R, and use that for both R and luminance. I refer to this as "Starizona Method 1," as it follows the instructions at this link. I also use the Photoshop channel mixer to boost the HαR after doing this, to prevent all my stars from being bluish. Typically I boost to 200%. This is HαRRGB, and I think it looks the best of all.

This image combines Hα data from 10 Dec 2014 with RGB data from 25 Feb 2014. I roughly followed Starizona method 1 (the difference being I use the channel mixer in Photoshop to boost the HαR to 200%), but I’m still struggling with blending Hα and RGB. The dimmer stars always come out looking blue with this method, I presume because when the HαR is made the dimmer stars don’t show up, so if the HαR is used for the R channel the dim stars don’t have enough R. I don’t know how to fix this currently. However, this definitely looks a lot better than the RGB alone did, and actually has better color than using Hα luminance with straight RGB.

Sunday, November 23, 2014

The Flaming Star Burns Brighter in Hydrogen-α; Straton is fun!

For some reason the name "Flaming Star Nebula" has always been attractive to me, and the object itself is beautiful: it's a combination of a lot of hydrogen emission with some delicate blue reflection, in some ways a lot like the Orion Nebula. I suspected it would look good in Hα so when it moved high enough in my sky I turned my telescope in its direction. I had intermittent high clouds. My chiller was broken so I didn't cool the camera, but the night was cool enough. I had trouble plate solving (it's a lot harder in Hα due to fewer stars), but found β Tau OK and used the PicGoto from there. #!%!!??! Windows did an automatic update on me and killed the session early, but the mount was about to bump and it also looked like the clouds were coming back about then anyway. I've disabled the automatic update "feature" now, I hope. Regardless, the Flaming Star looks very nice in Hα. Here is the Hα image; a lot of emission and detail is visible. This is an animated GIF alternating between grayscale and false color.

Date: 6 Nov 2014
Subject: IC 405, Flaming Star Nebula
Scope: AT8IN + Antares 0.5x Telereducer
Filter: Baader Planetarium 7 nm Hα
Mount: CG-5 (Synta motors, PicGoto Simplificado)
Guiding: 9x50 Finder/Guider + DSI Ic + PHD 2.3.1k (Win 7 ASCOM)
Camera: DSI IIc no chiller 5-10 °C
Acquisition: Nebulosity 3.2.1, no dither
Exposure: 23x600 s
Stacking: Neb 3, bad pixel map, bias included, 35 flats, OSC extract R, normalize, trans+rot align, 1.5 SD stack.
Processing: StarTools 1.3.5.289 Crop; Develop 75.00%; HDR:Optimize; Life:Less=More; Deconvolute: 5.0 pix; Track 5.3 pix; Magic 1 pix. Photoshop CC 2014 + Carboni Astronomy Tools Deep space noise reduction; Hα false color dark space; Astroframe; assemble animated GIF.

After seeing the Hα, I realized I really needed the blue reflection as well, so I waited for the Moon to move away and captured a long one-shot color data set. The night was very cold and clear. I synched from β Tau and easily acquired the target with the PicGoto; I used the markers in Nebulosity to align the shot to match my previous Hα image for later combining. The CCD ran from about 2.5 to -5.5 °C with no chiller (it's still broken). The tiniest bit of wind gave no guiding issues. I threw out about the first hour's worth of subs due to poor focus. I imaged up to the meridian, then did a meridian flip and took in a few Leonid meteors (I saw a bright one streak right across Orion, leaving a trail). I used Astrotortilla to resynch, reacquired with the PicGoto, realigned, and continued imaging until dawn. I think the image turned out really nice; you really do need to see the blue to get the full "flame" effect. Here it is:
Date: 17 Nov 2014
Subject: IC 405, Flaming Star Nebula
Scope: AT8IN + Antares 0.5x Telereducer
Filter: Baader Planetarium Fringe Killer
Mount: CG-5 (Synta motors, PicGoto Simplificado)
Guiding: 9x50 Finder/Guider + DSI Ic + PHD 2.3.1l (Win 7 ASCOM)
Camera: DSI IIc no chiller 2.5 to -5.5 °C
Acquisition: Nebulosity 3.2.1, no dither
Exposure: 78x300 s
Stacking: Neb 3, bad pixel map, bias included, 35 flats, normalize, deBayer & square, trans+rot align, 1.5 SD stack.
Processing: StarTools 1.3.5.289 Crop; Wipe: Aggressiveness 85%, Corner aggressiveness 163%, Drop off point 85%; Develop 82.53%; HDR:Optimize; Color:Scientific, 235%;  Life:Moderate; Deconvolute: 1.8 pix; Track 5.3 pix; Magic 1 pix. Photoshop CC 2014 + Carboni Astronomy Tools healing brush; Increase star color; Levels; Astroframe.

I did these two images with the intent of combining them to make an HαRRGB image, but my first few attempts using my previous methods were unsatisfactory, usually because using the Hα for the red channel or for luminance always left the stars looking blue. The red channel in the RGB is quite bright. So I set this aside for a day or two, then I ran across some references to Straton, a piece of Windows software that does beautiful automatic star removal, image subtraction, and similar things. At 15 euros, it falls within the realm of "inexpensive" (notice I did not say "cheap"); this works out to about $20 at current exchange rates. I played with the free trial and then bought Straton; it works fine under Windows 7/VMWare on my Macbook. Straton allowed me to remove the stars from the Hα image, and to make a "stars only" version I could use as a layer mask in Photoshop. I combined Hα without stars plus about 50% of the stars added back in, with the R channel from the RGB, and I used the same combination for luminance but layered the original RGB on top of that with a "hide all" layer mask allowing only the stars to show to preserve the original star color. I like this result, but I’m still learning so I might learn to do better. Here it is:
This shows a lot more detail in the emission. The stars still look a bit blue, but not too bad. Straton was definitely worth my $20, and I plan to play with it some more.

Sunday, November 9, 2014

Catching Tadpoles

When I was little, I used to catch tadpoles from the pond and watch them metamorphose into frogs. So I was intrigued a few years back when I saw images of the Tadpole Nebula in 100 Best Astrophotography Targets. It has two pillar structures that very much resemble the little immature amphibians. I tried several times to image the nebula, but could never really see the tadpoles, and concluded that they were just beyond the ability of my gear. Well, it wasn't my gear. With the Hα filter performing well on emission nebulae like this one I've been anxious to try it on IC 410, the Tadpole Nebula. Sure enough, the tadpoles were easily visible in my subframes. The full moon was quite near during this session, and probably hurt the contrast in the image a bit. I'm only intermittently able to get Astrotorilla plate solves when using the Hα filter, and this session was no exception to that. I initially synched on β Tau, did the goto, and imaged up to the meridian. After doing a meridian flip, I tried to use Astrotortilla to resynch and reacquire, and it just kept driving the scope farther and farther AWAY from the target. I wasted about an hour of sleep time messing with it, then finally went back out and manually aimed at β Tau, synched, and went right to the target. My chiller is still broken, but CCD temperatures started at 10 °C and fell as the night wore on. The tadpoles are easily visible in the stacked Hα image at the upper left, "swimming" toward the core of the nebula. I've been having fun working out how best to present Hα data, and finally settled on what you see here, an animated GIF that alternates between greyscale, which I think shows a bit more detail, and Hα false color, which is close to the true color emitted.
Date: 7 Nov 2014
Subject: IC 410, Tadpole Nebula
Scope: AT8IN + Antares 0.5x Telereducer
Filter: Baader Planetarium 7 nm Hα
Mount: CG-5 (Synta motors, PicGoto Simplificado)
Guiding: 9x50 Finder/Guider + DSI Ic + PHD 2.3.1k (Win 7 ASCOM)
Camera: DSI IIc no chiller 5-10 °C
Acquisition: Nebulosity 3.2.1, no dither
Exposure: 41x600 s
Stacking: Neb 3, bad pixel map, bias included, no flats, OSC extract R, normalize, trans+rot align, 1.5 SD stack resize 2x.

Processing: StarTools 1.3.5.289 Crop; Develop 60.00%; HDR:Optimize; Deconvolute: 5.0 pix; Track 5.1 pix; Magic 1 pix. Photoshop CC 2014 + Carboni Astronomy Tools Hα false color dark space; Astroframe; assemble animated GIF by pasting uncolorized layer on top of false colored layer and manually aligning then making frame animation.

Encouraged by this result, I decided to dig up some older RGB data that were obtained at the same imaging scale and make a composite image. The RGB data are really pretty lousy (the subframes were not exposed long enough, and I probably should have used the UHC-S filter to improve the contrast). I had some trouble aligning the layers even though I pre-aligned them using Nebulosity. The red channel is 25% from the RGB and 75% from the Hα, and the Luminance came from Hα with 80% opacity. I was quite pleased with how the composite turned out, especially given how bad the RGB looked.

Wednesday, November 5, 2014

California Dreaming

I've wanted to image the California Nebula for some time, but always assumed it was out of my reach because it is too large for my optics and its surface brightness is too low (I thought). My wife and daughter are both native California girls so California has a special place in my heart. Realizing this nebula is a hydrogen-α emission region, I decided to give it a try with the Hα filter. Since the Moon is bright again, it was time to make the attempt. To maximize my field of view, I decided to go with my ST80 telescope with a focal reducer.

I've been using my AT8IN Newtonian reflector recently, so I needed to switch telescopes. In the past this has been a pain because I'd have to move my finder/guider and my Telrad sight from one scope to the other, then realign all the optics. This time I decided to try the switch to the ST80 scope "cold turkey": I just mounted the finder/guider on the ST80 without changing any alignment and didn't even bother to take the Telrad sight off my AT8IN reflector, so I'm not using anything to aim the ST80 scope other than bare eyeballs along the optical tube. I did look at the Moon first to make sure the ST80 was focused. Anyway, the plan was to rely on Astrotortilla to find the target. It didn't work at first, until I realized I was setting Astrotortilla to the field of view of the AT8IN, not the wider field of the ST80. It's a little challenging to do Astrotortilla plate solves with the Hα filter in place (because the filter drastically cuts down the number of stars visible in the image), and to top it off, my Peltier cooler failed big time while I was doing this and just got hot instead of cooling. The CCD temperature got up into the 40's (Centigrade) before I realized something was wrong and numerous hot pixels masqueraded as stars, competing for Astrotortilla's attention. Fortunately the weather has turned cold, so the CCD was down below 5 °C once I really got the session rolling. Eventually, I did get plate solving to work after setting the field of view correctly and taking longer exposures. The California Nebula was quite easy to find once I got the scope aimed at the star ε Per; the thing is HUGE! I shot 2 sections of a mosaic, but *!#*! Windows decided to shut itself down for updating in the middle of the second session. I need to figure out how to shut off that autoupdate "feature." So much for staying up half the night to perform a meridian flip; my California Dream was a bit interrupted!

I've mentioned before that I'm a bit undecided about whether to present these Hα images in grayscale or in false color. I think maybe you can see more contrast in grayscale, but I like false color and the algorithm I'm using to do it (from Noel Carboni's Astronomy Tools suite in Photoshop) does a nice job. So this time I decided to have the best of both worlds and make an animated GIF that fades between the two views. I was a bit surprised at how many "likes" this got on Astrobin; it's an OK image, but I think it could be better.

One last aside: while I can see a resemblance to the state of California, I think this nebula looks more like a squid. The head is to the left, a dark eye is in the middle, and the tentacles trail to the right.
Date: 3-4 Nov, 2014
Subject: NGC 1499, California Nebula
Scope: Orion ST80 + Antares 0.5x telereducer
Filter: Baader Hα
Mount: CG-5 (Synta motors, PicGoto Simplificado)
Guiding: 9x50 Finder/Guider + DSI Ic + PHD 2.3.1k (Win 7 ASCOM)
Camera: DSI IIc no cooling
Acquisition: Nebulosity 3.2.1, no dither
Exposure: 22+9x600 s (2 panels)
Stacking: Neb 3, bad pixel map, bias included, flats, OSC extract R, normalize, square, trans+rot align, 1.5 SD stack resize 2x.

Processing: StarTools 1.3.5.289 Crop; Develop 50%; HDR:Optimize; Life:Less=More; Deconvolute: 3.0 pix; Track 5.0 pix; Magic 1 pix. Photoshop CC 2014 + Carboni Astronomy Tools Layer mask align & combine; Levels to match backgrounds; Hα false color black background in one panel; Astroframe.

Thursday, October 30, 2014

Getting More Out of My Gears

My guiding performance has progressively worsened of late. Not (I think) coincidentally, not long after I noticed this I also discovered the power cable for my camera fan had traveled through my RA gear train. Fortunately, the cable, although damaged, was not cut. I'm sure this played havoc with the RA gear meshing, so a few nights ago I loosed up the bolt holding my RA motor and tightened up the gear mesh. It made a noticeable difference.

I've been taking advantage of clear, calm skies with not much Moon over the last few days to do RGB imaging (I'll go back to Hα as the Moon gets more full, weather permitting--and it does not look good for the next few days). So I've attempted 2 new objects and 1 previously-imaged target, all of which I find quite difficult, and one very easy target.

First, the easy one, done before I fixed my gear issue: the Double Cluster in Perseus. This pair of bright open clusters is easy to find and image, and is one of the targets I tried very early in my astroimaging "career" via afocal eyepiece projection. I did it this night as a "warm up" target while waiting for M77 to rise. The only difficult thing about the Double Cluster is that it is so large it doesn't easily fit in my field of view. I opted for a 3-panel mosaic, stitched together using Photoshop's "photomerge" feature.  Here it is:
Date: 24 Oct 2014
Subject: NGC 869 & NGC 884, Double Cluster
Scope: AT8IN+Antares 0.5x focal reducer
Filter: Baader Fringe Killer
Mount: CG-5 (Synta motors, PicGoto Simplificado)
Guiding: 9x50 Finder/Guider + DSI Ic + PHD 2.3.1 (Win 7 ASCOM)
Camera: DSI IIc chiller at 2.50 A, 16.5 °C
Acquisition: Nebulosity 3.2.1, no dither
Exposure: 27+32+26x60 s
Stacking: Neb 3, bad pixel map, bias included, no flats, normalize first, trans+rot align, 1.5 SD stack.

Processing: StarTools 1.3.5.289 Crop; Wipe:Color & brightness 100,80,100%; Develop 80%; HDR:Optimize; Color:Scientific, 300%; Life:Moderate; Track: 2.5 pix; Magic shrink 1 pix. Photoshop CC 2014 Astronomy Tools Photomerge; Increase star color; Healing brush; Astro Frame.

When it rose, I switched to M77, Cetus A, which like most large galaxies has a large black hole in its nucleus (although this one is supposed to be bigger than average). This was a new target for me, and it proved difficult as my RA guiding (and, hence, my DEC too, because when one is bad the other generally is also) was haywire due to the bad gear mesh. I was happy to get some of the faint outer spiral arms to show up, but I probably could do better with this subject. It probably would look better with 600 s subframes rather than the 450 s I used, but the core is pretty bright and probably would have been severely overexposed at 600 s.
Found M77 (Cetus A) with Astrotortilla by synching from a "blind" plate solve. Conditions were above average, but guiding was terrible. I need to look into why my guiding is suddenly so bad; probably some gears need adjusting. A warm night for this time of year, chiller at 2.5 A, 14-5.5 °C. Got up to do a meridian flip and discovered I didn't need to; the mount was aligned so it wasn't going to bump. As my subframes came in I looked for the dim spiral arms and could not see them even with extensive stretching, so I was delighted to find they were easily apparent after stacking.

Date: 24 Oct 2014
Subject: M 77, Cetus A
Scope: AT8IN
Filter: Baader Fringe Killer
Mount: CG-5 (Synta motors, PicGoto Simplificado)
Guiding: 9x50 Finder/Guider + DSI Ic + PHD 2.3.1k (Win 7 ASCOM)
Camera: DSI IIc chiller at 2.50 A, 5-7 °C
Acquisition: Nebulosity 3.2.1, no dither
Exposure: 48x450 s
Stacking: Neb 3, bad pixel map, bias included+flats, normalize, trans+rot align, 1.5 SD stack.
Processing: StarTools 1.3.5.289 Crop; Wipe 80%; Develop 80.11%; HDR:Reveal core; Color:Scientific 250%; Life:Moderate; Deconvolute: 3.0 pix; Track 7.1 pix; Magic 1 pix (twice). Photoshop CC 2014 + Carboni Astronomy Tools Increase star color; Deep space noise reduction; Healing brush; Astroframe.

At this point I decided something was wrong and tuned up my gear mesh as noted above. I got much better guiding in the session that followed (sub arcsec) after resetting the mesh on my RA gears. This is a target Kier suggests (in The 100 Best Astrophotography Targets) would be difficult with a one-shot color camera, so I decided to use a light pollution filter (this target was in the light dome of the city to my north (Provo, Utah) most of the night) and go with 600 s subframes. It’s a beautiful object. It looks like it has a lot of Hα, though I wonder if some of the reddening is just due to the light passing through the dust of the Milky Way’s disk plane. The core, which Wikipedia reports is an H II region, is quite bright, easily visible in my imager at 1 s exposures. I was quite pleased with this image.

Date: 28 Oct 2014
Subject: IC 342, Spiral galaxy in Camelopardalis near Milky Way galactic plane
Scope: AT8IN
Filter: Baader UHC-S
Mount: CG-5 (Synta motors, PicGoto Simplificado)
Guiding: 9x50 Finder/Guider + DSI Ic + PHD 2.3.1k (Win 7 ASCOM)
Camera: DSI IIc chiller at 2.50 A, 3-7 °C
Acquisition: Nebulosity 3.2.1, no dither
Exposure: 30x600 s
Stacking: Neb 3, bad pixel map, bias included, no flats, normalize, trans+rot align, 1.5 SD stack.
Processing: StarTools 1.3.5.289 Crop; Wipe 75%; Develop 87.49%; HDR:Optimize; Color:Scientific 225%; Life:Moderate; Deconvolute: 2.0 pix; Track 5.0 pix, Smoothness 84%; Magic 1 pix. Photoshop CC 2014 + Carboni Astronomy Tools Increase star color; Deep space noise reduction; Levels with a layer mask; Astroframe.


Finally, with one last night of good weather I decided to return to the Nautilus Galaxy, because I just wasn't satisfied with what I got the last time out (see my earlier post). The combination of UHC-S high contrast filter and 600 s subframes worked so well on IC 342 that I decided to try it on the Nautilus. Guiding was still pretty good. I might be able to do better, but this is still the best Nautilus I have gotten so far. I tried layering this stacked image with the one I got a few nights ago using 480 s subframes, but I like the pure 600 s subframe image better. I did all my finding with Astrotortilla+Picgoto, both originally and after a meridian flip. It worked great. 
Date: 29 Oct 2014
Subject: NGC 772, Nautilus Galaxy
Scope: AT8IN
Filter: Baader UHC-S
Mount: CG-5 (Synta motors, PicGoto Simplificado)
Guiding: 9x50 Finder/Guider + DSI Ic + PHD 2.3.1k (Win 7 ASCOM)
Camera: DSI IIc chiller at 2.50 A, 3-7 °C
Acquisition: Nebulosity 3.2.1, no dither
Exposure: 38x600 s
Stacking: Neb 3, bad pixel map, bias included+flats, normalize, trans+rot align, 1.5 SD stack.
Processing: StarTools 1.3.5.289 Crop; Wipe:Color & brightness 75%; Develop 90.05%; HDR:Optimize; Color:Scientific, 265%, cap green to yellow; Deconvolute 2.3 pix; Life:Moderate; Life:Less=more; HDR:Optimize; Track Grain size 10.2 pix, Smoothness 81%; Magic:Shrink 1 pix; Rotate 180°; Repair:Warp. Photoshop CC 2014 + Carboni Astronomy Tools Deep space noise reduction; Levels (darken); Layer mask; Astro Frame

Friday, October 24, 2014

Astrotortilla is Truly Yummy!

Side note: I got to see yesterday's partial solar eclipse through a Lunt Solar Systems Hα solar telescope (owned by the Brigham Young University Astronomy Club; they were out observing the eclipse and doing public outreach). These are extremely narrowband scopes, and the view was astounding; prominences were visible all around the solar limb. Now I want a narrowband solar scope (you can't get enough contrast to see prominences with a simple filter like my Baader Hα imaging filter), but they ain't cheap!

A while back I mentioned Astrotortilla. Astrotortilla is a plate solving program, which means it looks at the stars in your image, matches the patterns with patterns in a database, and tells you where in the sky you are pointed. It's also a Windows "wrapper" program, which means it can communicate with and control Windows ASCOM-based imaging programs (such as Nebulosity 3) and mount control programs (such as PicGoto server). I played with it a while back and didn't get it to work consistently, so I moved on. 

A couple of days ago I ran across this excellent tutorial on how to set up and use Astrotortilla. That motivated me to try again. One of the key things I found should have been obvious, which is that because my Meade DSI IIc camera does not have square pixels, it is essential to square the image before attempting a plate solve; otherwise the shapes of the asterisms are wrong and are not recognized. Anyway, after squaring things up I was able to plate solve saved images.

So last night I decided to try to image the Nautilus Galaxy. My prior efforts on the Nautilus were less than satisfactory. This big galaxy is pretty far away and hence it looks small and not terribly bright, so for me it is quite a challenging target. Conditions were poor last night (intermittent high clouds) and I had significant guiding issues as well, which improved as I played with the mount's balance. However, another part of the session was a huge success: I finally got Astrotortilla working, and it is awesome! 

Specifically, I imaged up to the meridian after finding the object in my typical way, by synching the PicGoto on β Ari and doing a successful goto. After doing my meridian flip, the scope was at an awkward angle where I had trouble getting my old back contorted to be able to aim accurately through my Telrad sight. Because I had been successfully plate solving on some saved test images, I decided to try using Astrotortilla to synch rather than actually centering a bright star. At first I let the program move the mount too, and that was fouled up because Astrotortilla obviously didn't know which side of the meridian the mount was on, and headed in the wrong direct. So I settled on just using it to synch the mount through ASCOM, then selecting my target and doing the goto through the Cartes du Ciel program's interface. Cartes du Ciel / PicGoto does know how my mount is oriented, because I tell it in a software setting. That worked marvelously. So no longer do I even need to find and synch on a bright star; just point somewhere near my target and let Astrotortilla do its thing. And it is FREE! It doesn't get any cheaper than that. AMAZING! 

The Nautilus Galaxy image itself is still less than satisfactory, but I do see traces of an outer arm or star stream to the left of the core; I didn't know that was there.

Date: 23 Oct 2014
Subject: NGC 772, Nautilus Galaxy
Scope: AT8IN
Filter: Baader Fringe Killer
Mount: CG-5 (Synta motors, PicGoto Simplificado)
Guiding: 9x50 Finder/Guider + DSI Ic + PHD 2.3.1k (Win 7 ASCOM)
Camera: DSI IIc chiller at 2.50 A, 5-7 °C
Acquisition: Nebulosity 3.2.1, no dither
Exposure: 22x480 s
Stacking: Neb 3, bad pixel map, bias included+flats, normalize, trans+rot align, 1.5 SD stack.

Processing: StarTools 1.3.5.289 Crop; Wipe 80%; Develop 82%; HDR:Equalize; Contrast; Life:Moderate; Color:Scientific 299%; Track 9.9 pix, smoothness 80%; Magic 1 pix. Photoshop CC 2014 + Carboni Astronomy Tools Deep space noise reduction; Levels (layer masked); Increase star color; Astroframe.

Thursday, October 23, 2014

Returning to the Sculptor Galaxy


I finally got a good night to revisit one of my favorite targets, the Sculptor Galaxy. It is pretty low in my southern sky, but a beautiful, bright object as galaxies go, so it was one I tried early in my foray into astrophotography and one where I like to return. I missed it last year because the tracking controls of my mount were broken, but this year I want to try out my newly-learned skills and improved PicGoto mount control. 

Conditions were better than average with just a slight bit of wind.  I got a late start because I did the Chemistry Magic show earlier in the evening, but it wouldn't have made a lot of difference because NGC 253 doesn't rise over the mountain until around my starting time anyway. I synched from Diphda (β Cet) and the PicGoto was right on. With as much Dec backlash as my mount has, it is amazing to me how well the PicGoto always seems to do. I used a developer build of PHD2 (2.3.1k, I believe) and it seems to be unstable. More than once last night I got calibrated, started guiding, stopped to reframe the image, then had PHD2 (my guiding software) crash when I tried to start looping again. So I had to start over and recalibrate two or three times and didn't get imaging started until about 10:30 PM. I think I'm going to go back to the last stable release build of PHD2 and see if these problems are due to the build or to all the other software changes I've made. This image needs some flats (I need to remove several dust bunnies), which I can probably get tonight (I left for work before dawn this morning!).

Here's the picture. I still think this is one of the most beautiful galaxies out there, and this is my best image of it so far.
Date: 22 Oct 2014
Subject: NGC 253, Sculptor Galaxy
Scope: AT8IN
Filter: Baader Fringe Killer
Mount: CG-5 (Synta motors, PicGoto Simplificado)
Guiding: 9x50 Finder/Guider + DSI Ic + PHD 2.3.1k (Win 7 ASCOM)
Camera: DSI IIc chiller at 2.50 A, 5-7 °C
Acquisition: Nebulosity 3.2.1, no dither
Exposure: 45x300 s
Stacking: Neb 3, bad pixel map, bias included, no flats, normalize, trans+rot align, 1.5 SD stack.
Processing: StarTools 1.3.5.289 Crop; Wipe:Color & brightness 78%; Develop 79.3%; HDR:Optimize; Deconvolute auto mask 3.0 pix; Color:Scientific, 300%; Track Grain size 3.0 pix; Magic:Shrink 1 pix (twice). Photoshop CC 2014 + Carboni Astronomy Tools Increase star color; Levels (darken) with a layer mask to take out some dust bunnies; Astro Frame.

Sunday, October 19, 2014

Animal Heads in Space

The past week has been a combination of cloudy and busy so I haven't been able to image much, but I did get in a couple of targets, a brand new (to me) one and an often-imaged, iconic one. I did both using my hydrogen alpha filter. Both targets look to me like animal heads, hence the kind of dumb title for this post.

The first is the Gamma Cassiopeiae Nebula, also known as the "Ghost of Cassiopeia" (which I suppose is fitting for October since we celebrate Halloween at the end of this month in the U.S.). This is another foray away from the 100 Best Astrophotography Targets list, so once again I wasn't sure it would be bright enough for me to image. It was, and made a really nice target. It looks to me a lot like the head of a longhorn steer or like the ox skulls that the pioneers in the American west used to leave along the trail, and it even looks a bit like the Greek letter gamma, as befits its namesake star.
Another object that caught my eye on Astrobin, the "Ghost of Cassiopeia" is trivially easy to find because it's in the same field of view as the bright star γ Cas. I deliberately left γ Cas in the frame because that star is what lights up this nebula. Chiller at 2.5 A, 12.5 °C. Clouds rolled in and ended the session early, so I finally shot a new set of darks and created a new bad pixel map to use with this. 

Date: 11 Oct 2014
Subject: IC 63, γ Cas Nebula, “Ghost of Cassiopeia”
Scope: Astrotech AT8IN + Antares 0.5x telereducer
Filter: Baader Hα
Mount: CG-5 (Synta motors, PicGoto Simplificado)
Guiding: 9x50 Finder/Guider + DSI Ic + PHD 2.3.1 (Win 7 ASCOM)
Camera: DSI IIc chiller at 2.50 A, 11.5-9.0 °C
Acquisition: Nebulosity 3.2.1, no dither
Exposure: 20x600 s
Stacking: Neb 3, bad pixel map, bias included, no flats, OSC red channel extract, normalize, square, trans+rot align, 1.5 SD stack.

Processing: StarTools 1.3.5.289 Crop; Develop 75%; HDR:Optimize; Life:Moderate; Deconvolute 3.5 pix; Track Grain size 6.0 pix; Magic:Shrink 1 pix. Photoshop CC 2014 + Carboni Astronomy Tools deep space noise reduction, Hα false color; Astro Frame.

I shot my second target last night (actually early this morning). It's one I have done many times in the past, but I've been looking forward to trying the Horsehead in H-α, and last night, after getting home from a late football game (which wasn't too much fun; BYU's team, and particularly their defense, is weak this year), I saw Orion rising and already had the scope outside (to get it out of the way of my daughter and son-in-law's moving activities), so I decided to give it a shot. The weather was good, save for some wind gusts. This session involved lots of new software: OSX Yosemite, a new version of VMWare, and a new build of PHD2. This combination appears to be less stable as I crashed Nebulosity and PHD2 repeatedly, but I guess to really give it a fair shot I need to do a fresh reboot prior to starting the session. I had some trouble getting PicGoto Server to connect (I had to keep hitting the "connect" button repeatedly until it made the connection.) I'm still having problems with my USB connections in general, but that may not be software-related. All that said, this image is dramatically better than the Horseheads I have gotten before. The details in the nebulosity just pop, and at last I can see the curtain-like streaks in the background gas.  Now I want to do a wider field of view with my ST-80 refractor.
Date: 19 Oct 2014
Subject: IC 434, Horsehead Nebula
Scope: Astrotech AT8IN + Antares 0.5x telereducer
Filter: Baader Hα
Mount: CG-5 (Synta motors, PicGoto Simplificado)
Guiding: 9x50 Finder/Guider + DSI Ic + PHD 2.3.1 (Win 7 ASCOM)
Camera: DSI IIc chiller at 2.50 A, 6.5 °C
Acquisition: Nebulosity 3.2.1, no dither
Exposure: 23x600 s
Stacking: Neb 3, bad pixel map, bias included, no flats, OSC red channel extract, normalize, square, trans+rot align, 1.5 SD stack.
Processing: StarTools 1.3.5.289 Crop; Autodev; HDR:Optimize; Life:Less=More; Deconvolute 4.0 pix; Track Grain size 3.0 pix; Magic:Shrink 1 pix. Photoshop CC 2014 + Carboni Astronomy Tools Hα false color; Astro Frame.

Saturday, October 11, 2014

A Heart and a Rose in Hydrogen Alpha

The sky has been mostly clear for the last few days, but in the past I would not have been able to take advantage of it because we are in the time of the full Moon. (One night that was not clear was the night of the full Moon and lunar eclipse, so I missed that.) Now, as I've noted previously, full Moons don't matter as long as I have an emission nebula I want to image, because my Hα filter rejects all that bright moonlight.

I've never tried the Heart Nebula before because it is much larger than the field of view I can get with any of my scopes (other than using a focal reducer on my finder scope, which produces horrible optical aberrations). But the Heart is a nice H-emission object, so I decided to give it a try and do a mosaic after seeing a nice mosaic by Jammie Thouin on Astrobin (http://astrob.in/126100/0/). My strategy was to use my ST-80 refractor with a focal reducer to maximize the field of view and the optical speed, and line things up to do a 4-panel mosaic. The Thouin image helped a lot in deciding how to frame the pictures. I got two parts of the mosaic each night, so it took two nights to do this. Even though I've seen plenty of pictures of it before, I had no idea how beautiful the Heart Nebula is. And it does look like a heart, though I guess it's one that has some disease because one chamber is bigger than the other. Combining the frames was challenging. I did most of it with Photoshop Photomerge, but a little layer masking also helped to make things blend smoothly.
My first attempt at the Heart Nebula. Synched from ε Cas; the PicGoto centered IC 1805 (the central cluster), which is visible even through the filter with 2 s exposures. Chiller at 2.5 A, T = 9-4 °C. Imaged the left bottom portion 1st, 13 600-s subframes, then moved to the left top portion and ran until the mount bumped, 23 600-s subframes. Perfect conditions on 9 Oct and the result was the best guiding performance I have ever had (so far); RMS < 1". Chiller at 2.5 A, 10.5 °C. Synched from ε Cas on the second night and was dead center. Realigned using a frame from 6 Oct, then moved over to get the next panel of the mosaic. Partway through the run I lost USB connection to my cameras and had to recalibrate; guiding was still very good afterward, but not as good as before, which leads me to believe that guiding performance is more strongly dependent on calibration than I had thought. Combined all but the upper left panel with Photoshop Photomerge; the stubborn upper left panel had to be put in by hand. 

Date: 6, 9 Oct 2014
Subject: IC 1805 / NGC 896 / Sh2-190, Heart Nebula
Scope: Orion ST-80 + Antares 0.5x telereducer
Filter: Baader Hα
Mount: CG-5 (Synta motors, PicGoto Simplificado)
Guiding: 9x50 Finder/Guider + DSI Ic + PHD 2.3.1 (Win 7 ASCOM)
Camera: DSI IIc chiller at 2.50 A, 3.5 to -1 °C (Oct 6); 10.5 to 9.0 °C (Oct 9)
Acquisition: Nebulosity 3.2.1, no dither
Exposure: 13x600 s (bottom left), 23x600 s (top left), 23x600 (bottom right), 34x600 (top right)
Stacking: Neb 3, bad pixel map, bias included, no flats, OSC red channel extract, normalize, square, trans+rot align, 1.5 SD stack.
Processing: StarTools 1.3.5.289 Crop; Develop 65%; HDR:Optimize; Contrast; HDR: Optimize; Life:Moderate; Track Grain size 5.0 pix; Magic:Shrink 1 pix. Photoshop CC 2014 + Carboni Astronomy Tools Photomerge, Gaussian blurred layer combine (top left), Hα false color; Astro Frame.

Sh2-206 (which doesn't have a common name as far as I know) reminds me of the Iris Nebula, but it's the wrong color as it shines mostly in Hα rather than by reflection like the Iris. So this nebula looks more like a rose. I’m starting to stray a lot from the "Top 100" list, and this is a foray away from it. 

Synched from α Per and found on the first try with the PicGoto. The core of the nebula is visible even at 2 s in the imager, but the fringes are much fainter. Not many bright stars in my field of view either, but without trouble I did find a guide star bright enough for my usual 1 s guide exposures. Chiller at 2.5 A, 11 °C. Before I went to bed I noticed the guider was having some trouble keeping the guide star aligned in Dec, and I should have paid attention because shortly thereafter the problem became severe. I think the Dec clutch was probably slipping, but in any event I got a lot less data than I had planned to get. Eventually, the whole session hung because the USB connection dropped. I need to solve that problem!

Date: 10 Oct 2014
Subject: Sh2-206 / NGC 1491
Scope: Astrotech AT8IN + Antares 0.5x telereducer
Filter: Baader Hα
Mount: CG-5 (Synta motors, PicGoto Simplificado)
Guiding: 9x50 Finder/Guider + DSI Ic + PHD 2.3.1 (Win 7 ASCOM)
Camera: DSI IIc chiller at 2.50 A, 11.5-9.0 °C
Acquisition: Nebulosity 3.2.1, no dither
Exposure: 20x600 s
Stacking: Neb 3, bad pixel map, bias included, no flats, OSC red channel extract, normalize, square, trans+rot align, 1.5 SD stack.
Processing: StarTools 1.3.5.289 Crop; Develop 50%; HDR:Optimize; Life:Moderate; Track Grain size 5.0 pix; Magic:Shrink 1 pix. Photoshop CC 2014 + Carboni Astronomy Tools deep space noise reduction, Hα false color; Astro Frame.

I'm planning to try the γ-Cassiopeia "Ghost of Cassiopeia" Nebula next, another Hα emitter.

Sunday, October 5, 2014

Andromeda Again

The Andromeda Galaxy is one of my very earliest deep sky astrophotography targets. I remember looking at it through a small telescope when I was young, and seeing just a fairly unimpressive blob of light. When I began playing with my point-and-shoot digital camera, this was one of the first objects I tried via afocal, eyepiece projection astrophotography.  The first attempts were little more than blurry blobs, but I was thrilled to see dust lanes I could not see visually. Since then, each fall I've tried again to see if I can improve on previous images. This first picture was taken with just the point-and-shoot camera with the lens zoomed up.

1 Nov 10: Andromeda wide field, taken piggyback on the telescope mount with just the camera (not through the telescope).  Stack of 24 RAW frames (Deep Sky Stacker, dark frame subtracted).  Stretched via GimpShop.  PowerShot A560 camera at 800 ISO, f/5.5 (4x optical zoom), 256 s exposures.  Both the big satellite galaxies (M32 and M110) are visible in this image. if you know where to look.


The second image was taken using eyepiece projection through a telescope (a Meade 4501 4.5" Newtonian reflector). There's lots of vignetting and you can see the edge of the round field of view, but I was thrilled to see the satellite galaxies and some dust lane structure.


28 Jan 2011: M31, M32 (to right), M110 (upper left of center).  Stack of 22 RAW images (DSS).  Afocal, PowerShot 560 camera at f/2.6 on camera, 800 ISO, 32 s exposures, dark subtraction in camera, Sirius-Plössl 40 mm eyepiece projetion (so system f/1.16).  GimpShop Curves & Levels.  Dust lanes faintly visible all the way around, 2 in the direction of M110.


Getting a real astrophotography camera and switching to prime focus astrophotography was a huge step up. By this point I had also gotten my Astro-tech 8" Imaging Newtonian telescope, another big step up. In the fall of 2011 I spent many nights putting together a panaroma. My field of view was small so it took quite a few images to do this.  Getting the images to blend together smoothly was a big challenge.


In December 2011 I got a used Orion Short Tube 80 mm refractor.  This gave me a bigger field of view. The following fall I used the big field of view to try to capture the whole galaxy in one frame. I had also learned better color processing. By this point I had developed a lot of the protocols I still use for documenting my images. 

An easy find, obviously, as M31 is a naked eye object.  Lots of smoke in the air tonight.  I had to play with exposures a lot to avoid blowing out the core.  300 s was too long, and eventually I settled on 180 s subframes.  Guiding is so easy when imaging at this scale!  But I couldn’t get dither to work because none of the settling options were large enough for guiding at this focal length with my mount.  I removed the Meade IR filter from the DSI as the Baader Fringe Killer filter I was using also cuts IR.  I'm waiting on a new power supply for my chiller, so it is still not working and the CCD was at about 16 °C for the run.

Date: 18 Sep 2012
Subject: M31, Andromeda Galaxy
Scope: Orion ST80 + 0.5x Antares telereducer
Filter: Baader Fringe Killer (DSI IR cut filter removed)
Mount: CG-5 (Synta motors)
Guiding: AT8IN+High Point Scientific coma corrector + DSI Ic + PHD
Camera: DSI IIc (no cooling)
Acquisition: Nebulosity 3.1.1, no dither
Exposure: 64 x 180 s
Stacking: Neb 3, bad pixel map, bias included, normalize first, trans+rot align, 1.5 SD stack
Processing: Digital development with weak sharpening, curves, power stretch, GreyCStoration (on background layer) saturation boost in Neb 3; CS6 2 layers: background layer Astronomy Tools color blotch, deep space, space noise reduction. Sharp layer was high pass filtered.  Combined the two with a Gaussian blurred layer mask over the dust lanes.  Horizontal band noise reduction and star color enhance the flattened image.

My 2013 effort was not a huge improvement over 2012. I think it was a bit over processed as I attempted to bring out color in the spiral arms.
Conditions tonight are absolutely gorgeous.  However, I'm having terrible problems with the RA tracking on my mount.  I guess I've let it crash one time too many.  I can only get it to track by heavily east-weighting; otherwise, the motor slips and the gears don't turn.  I've seen hints of this problem before, but tonight it is severe.  I may have to get a new set of motors, but I hate to invest any more in this mount.  When the tracking was working, the guiding was excellent, about the best I've ever done.  

Date: 30 Sep 2013
Subject: M31, Andromeda Galaxy
Scope: Orion ST80 + Antares 0.5x focal reducer (on 1” nosepiece, so ~0.65x)
Filter: Baader UHC-S
Mount: CG-5 (Synta motors)
Guiding: 9x50 Finder/Guider + DSI Ic + PHD 2.1.1a
Camera: DSI IIc (chiller at 2.25 A, -5 °C)
Acquisition: Nebulosity 3.1.8, no dither
Exposure: 42x300 s
Stacking: Neb 3, bad pixel map, bias included, normalize first, trans+rot align, 1.5 SD stack.
Processing: StarTools 1.3.5.255 Crop; Wipe:Color & Brightness; Develop 85.22%; Sharpen; Deconvolute 3.0 pix; Color:True Color, Dark Sat 4.0, Bright Sat Full, Sat 225%,; HDR:Optimize; Life:Heavy; Track Denoise; Magic:Shrink 1.  CS6+Astronomy Tools Increase Star Color; AstroFrame.

That finally brings me to the present. Rather than try to get everything in one image, this year I decided to try a 2-panel mosaic. I still don't have much color in the arms, but rather than try to force the issue I opted to just go for what my normal processing yields. I think this is the best so far.

I'm not satisfied with my M31s so far, so I'm trying again on what is one of my oldest deep sky targets. I'm trying a 2-panel mosaic of Andromeda Galaxy. Conditions are excellent: cool, clear, and calm. Chiller at 2.5 A, 4.5 °C. My guide scope is still out of focus; I must not have fully inserted the camera. I plan to do the north end of the galaxy as I image up to the meridian, then I'll do a flip and move to image the south end. Fixed the guider focus issue after the meridian flip. Guiding, for the moment at least, is improved. Excellent performance all the way until dawn. This target is deceptively difficult because of its size and very high dynamic range. I think the bottom and top of the mosaic still don’t match up very well. I could spend a lot more time trying to process this better, and probably will, but I think this is my best Andromeda so far. 

Extensively reprocessed in this revision. Some of the chief changes were more deconvolution to bring out detail and lots of layer mask work to keep the overexposed portions from standing out too sharply and to darken the background sky.

Date: 2 Oct 2014
Subject: M31, Great Andromeda Galaxy
Scope: Orion ST-80 + Antares 0.5x telereducer
Filter: Baader UHC-S
Mount: CG-5 (Synta motors, PicGoto Simplificado)
Guiding: 9x50 Finder/Guider + DSI Ic + PHD 2.3.1 (Win 7 ASCOM)
Camera: DSI IIc chiller at 2.50 A, 4 to 2 °C
Acquisition: Nebulosity 3.2.1, no dither
Exposure: Upper, 49x300 s, Lower, 57x300 s
Stacking: Neb 3, bad pixel map, bias included, no flats, OSC nebula filter extract, normalize, debayer and square, trans+rot align, 1.5 SD stack.
Processing: (attempting to do the same thing to upper and lower frames) StarTools 1.3.5.289 Crop; Develop 87.49%; Color: scientific, 250%; Deconvolute 2.0 pix; Life:Less=more; Track Grain size 7.2 pix, Smoothness 70%; Magic:Shrink 1 pix. Photoshop CC 2014 + Carboni Astronomy Tools Healing brush; Photomerge; Levels; Star color enhance (twice); Increase local contrast; Astro Frame.

Thursday, October 2, 2014

A Teddy Bear in Hydrogen Alpha

The skies finally cleared last night so I decided to get my gear out. The Moon is about at 1st quarter and I've been itching to try the Hα filter anyway, so I decided to image a new (to me) object, Sh2-199, aka the Soul Nebula. To me it looks more like a teddy bear viewed in profile (and I'm not sure what a soul looks like; I think it gets that name mostly because the other emitting part of the same gas cloud looks like a heart, and "heart and soul" go together).

Another thing I've been wanting to try is combining my Hα filter with my Orion ST-80 refractor. The ST-80 gives me a significantly wider field of view than I can get with my bigger 8" reflector, and at f/5 it is still reasonably fast, especially when I add a focal reducer to widen the field of view. Even with the reducer, I still couldn't quite fit the whole Soul. Using a reducer on this scope unfortunately magnifies its optical flaws, which are significant, but here's where being cheap (i.e. using a small-chip camera) helps a little. The optical aberrations are worst around the edges of the field of view, and my small imaging chip only samples the center. So that helps some. In addition, this rig is quite light, so in principle my telescope mount should be able to handle it more easily. In practice, I don't seem to get any better performance than I get with the heavy AT8IN reflector on the mount. Finally, at this imaging scale my guiding performance can be lousy and I can't tell.

So here's the Soul Nebula. The "teddy bear" is lying face down, with his head to the right. IC 1848 is the open cluster in the torso of the bear. Once again, I'm amazed at what I can pick up with that Hα filter. I'm excited to try imaging things like the Horsehead, Flaming Star, and Tadpole Nebulae with it, and those will be in position shortly.
First observation of the Soul Nebula; I chose it over the Heart because it looks like it will fit in my field of view slightly better. This is also my first use of the Hα filter with the ST-80 scope. Synched from ε Cas and the PicGoto put the Soul in the field of view on the first try. It took me a while to recognize I was there because the cameras on the ST-80 are oriented 180° from the orientation I use on the AT8IN and I didn't realize that at first. Cool, clear, calm evening. Chiller at 2.5 A, currently 3.5 °C. Guiding looks good enough for this imaging scale. Focusing was hard; I did it through the filter looking at the Moon and hope that will be adequate. My guide scope image is blurry: either out of focus or there's dew on the objective (I think probably I messed up the focus in moving the guider to the ST-80, but they say PHD performs a little better when a little out of focus. We'll see.) Very little differential flexure with this setup until the mount started bumping; then it jumped pretty well.

Date: 1 Oct 2014
Subject: Sh2-199 / IC 1848, Soul Nebula
Scope: Orion ST-80 + Antares 0.5x telereducer
Filter: Baader Hα
Mount: CG-5 (Synta motors, PicGoto Simplificado)
Guiding: 9x50 Finder/Guider + DSI Ic + PHD 2.3.1 (Win 7 ASCOM)
Camera: DSI IIc chiller at 2.50 A, 3.5 to -1 °C
Acquisition: Nebulosity 3.2.1, no dither
Exposure: 39x600 s
Stacking: Neb 3, bad pixel map, bias included, no flats, OSC red channel extract, normalize, square, trans+rot align, 1.5 SD stack.
Processing: StarTools 1.3.5.289 Crop; Autodev; HDR:Optimize; Deconvolute 3.0 pix; Life:Less is more; Track Grain size 5.0 pix, Smoothness 50%; Magic:Shrink 1 pix. Photoshop CC 2014 + Carboni Astronomy Tools Hα false color; Astro Frame.

Friday, September 26, 2014

Outer Limits and a Challenge

I continue to have nice imaging weather with no Moon, so I've been trying to take advantage. Our forecast is for things to turn rainy this afternoon, so imaging will likely be on hiatus for a while.

The night before last I decided to revisit the "Outer Limits" Galaxy, NGC 891, so called because it was featured in the introduction to the 60's TV show. I had imaged it a couple of years ago and got what were at the time excellent results, so I wasn't sure I could improve on that. I had some wind gusts that made me doubt even more, but set up the session, focused as well as I could, and went to bed. After stacking and processing the subframes, I was quite happy with the result. I think it's a clear improvement on what I did two years ago. I masked out the fuzzy edges of the galaxy when I deconvoluted, and that prevented them from getting grainy while I was able to process the dust lane aggressively. Here's the old image, then this year's for comparison. The newer image is sharper, better resolved, has tighter stars, and has better color. It's at a slightly smaller scale because I've stopped using my coma corrector (because it doesn't make any visible difference with the tiny imaging chip I'm using:

Maybe I was lucky, but this was a pretty easy find because after my first try with the Telrad I recognized a 3-star asterism and a 2-star asterism that were in the AT8IN field of view chart in AstroPlanner.  So it was a simple matter to move over and find the galaxy.  Since I knew what I was looking for, it was easy to see in 5 s in the imaging scope.  I can also see it in the guide scope at 1.5 s, again because I know where to look.  I'm still guiding at the 4x setting, and I've also loosened up the worm side-to-side adjustment a bit, reasoning that I don't really care about backlash in RA.  So we'll see how this turns out.  Chiller at 7 V, T=5 °C.  Medium RA dither, settling at 0.5.

Date: 7 Nov 2012
Subject: NGC 891 (Outer Limits Galaxy)
Scope: AT8IN+High Point Scientific coma corrector spaced properly
Filter: None
Mount: CG-5 (Synta motors)
Guiding: Orion ST80 + DSI Ic + PHD 1.13.7
Camera: DSI IIc (1.8 A, 7.0 V  T = 5 °C)
Acquisition: Nebulosity 3.1.2, medium RA dither, settling at 0.5
Exposure: 40/44 x 300 s
Stacking: Neb 3, bad pixel map & flats, bias included, normalize first, trans+rot align, 1.5 SD stack
Processing: Neb 3 crop and autocolor balance.  StarTools 1.3 develop, sharpen, color wipe, color saturation, life, magic (star shrink).  CS6 star color enhance, star shrink, curves.

I was a little hesitant to try NGC 891 because I already have a pretty good image of it from 2 years ago, but I decided to see if I could do better. Intermittent wind gusts, but very clear. Synched on γ1 Andromedae and the PicGoto put NGC 891 in my imaging field of view easily. Chiller at 2.5 A, falling from 18 to 11 °C through the night. I must have timed things just right because I went to bed and my imaging session ended just before the mount bumped, while I got a good night's sleep! I tried a bit more sophisticated deconvolution on this image than usual; I masked so I aggressively deconvoluted the dust lane but didn't touch the outer fringes of the galaxy. I probably should have masked the stars a bit more because I got some ringing, so maybe I'll redo the processing.  

Date: 24 Sep 2014
Subject: NGC 891, Outer Limits Galaxy
Scope: AT8IN
Filter: Baader Fringe Killer
Mount: CG-5 (Synta motors, PicGoto Simplificado)
Guiding: 9x50 Finder/Guider + DSI Ic + PHD 2.3.1 (Win 7 ASCOM)
Camera: DSI IIc chiller at 2.50 A, 18-11 °C
Acquisition: Nebulosity 3.2.1, no dither
Exposure: 62x300 s
Stacking: Neb 3, bad pixel map, bias included, no flats, normalize first, trans+rot align, 1.5 SD stack.
Processing: StarTools 1.3.5.289 Crop; Wipe:Color & brightness 75%; AutoDev with ROI; HDR:Optimize; Color:Scientific, 250%; Deconvolute auto mask+block outer parts of galaxy 3.5 pix; Life:Less is more; Track Grain size 5.9 pix; Magic:Shrink 1 pix. Photoshop CC 2014 + Carboni Astronomy Tools Healing brush; Increase star color; Astro Frame.

Last night I got the itch to try a new object. From Kier's 100 Best Astrophotography Targets, NGC 925 was in the right part of the sky. I'd never attempted it before because Kier says it is dim and that "LRGB methods are almost essential", and that even the luminance data might need to be 2x2 binned. That scared me off in the past with my lowly one-shot color camera, but this year I decided I'd give it a try. Kier is right that this galaxy has very low surface brightness. I initially tried 450 sec subframes, and decided that wasn't long enough, so I went to 600 sec, which is the longest I've ever attempted (and I probably couldn't go much longer with my mount). I also tried adjusting my focuser, thinking that it might be the source of the differential flexure I experience near the meridian (it didn't seem to make any difference though). Finally, I used my UHC-S filter, hoping to knock down the background sky glow. In retrospect, perhaps I should have just gone with the UV-IR cut filter. Anyway, I did get something:
This is one of those "don't image from the suburbs, LRGB methods are essential" type objects that I'm crazy enough to try anyway. I do like going after something new every once in a while, and this is a new object for me. Consider it a “challenge” object. Synched from β Tri and found on the first attempt. Some wind gusts & some scattered clouds, but conditions overall were very good. NGC 925 is quite dim, especially the spiral arms (the core is reasonably bright so not terrible to find at 5 s exposures or so). Chose the UHC-S filter, hoping to improve contrast between the galaxy and background sky glow. Used 600 s exposures for the imaging session. Got fairly good data all the way up to the meridian, and finally the mount bumped about 4 AM, ending the session.

Date: 25 Sep 2014
Subject: NGC 925
Scope: AT8IN
Filter: Baader UHC-S
Mount: CG-5 (Synta motors, PicGoto Simplificado)
Guiding: 9x50 Finder/Guider + DSI Ic + PHD 2.3.1 (Win 7 ASCOM)
Camera: DSI IIc chiller at 2.50 A, 18-11 °C
Acquisition: Nebulosity 3.2.1, no dither
Exposure: 40x600 s
Stacking: Neb 3, bad pixel map, bias included, no flats, OSC neb filter extract, normalize, trans+rot align, 1.5 SD stack.
Processing: StarTools 1.3.5.289 Crop; Wipe:Color & brightness 75%; Develop 87.49%; HDR:Optimize; Color:Scientific, 250%; Life:Moderate; Deconvolute auto mask 2.9 pix; Track Grain size 9.1 pix, Scl 1 100%, Scl 2 100%, Scl 3 96%; Magic:Shrink 1 pix (twice). Photoshop CC 2014 + Carboni Astronomy Tools Healing brush; Deep space noise reduction; Levels (darken); Increase star color; Astro Frame.